Saturday, December 31, 2011

New Year

May Happiness, Health and all your projects go with you through the New 2012 Year!!

Thursday, December 29, 2011

Crazy Quilt Challenge


Beginning on January The Crazy Quilt Journal Project will begin. For more information you can click on the sidebar button. Every month we are to complete a block and at the end of the year it will be put together. To help with our seam treatment, Sharon B's at Pintangle will have instructions on "Take a stitch on Tuesday". Her button "Tast" is on the side bar.  I have decided to embroider flowers that was a block of the month from Sentimental Stitches. Still need to finish 6 more blocks. The blocks will be sashed with the lady bug material. Yesterday I purchased leaf material and bird material. My goal is to have the leaf material over hang on the top, with possible leaves cut out and the birds appliqued on.
My first Block....


Tuesday, December 27, 2011

Flag Block


The International Crazy Quilting Group are putting together flag blocks from countries around the world. I have chosen the United States and there are over 22 more flag blocks. It will be put together as one big quilt and sent to our  CQ Sister, Hideko. Hideko will enter them in Japan Quilt Shows and will be sold. The funds will help the victims of the Sendai Earthquake. I have lots of crazy quilt stitches, silk ribbon and a tatted eagle. Pattern from Nancy Tracy.

Sunday, December 18, 2011

Tuesday, November 8, 2011

Needle Book

Needle book is completed for my Christmas Exchange. Ms Green loves sheep and her initials are tatted in Lizbeth green thread!!

The inside are wool squares.

Every one needs extra pairs of embroidery scissors.

The last page I made a pocket to add sewing notions. This one is stuffed with hand dyed silk ribbon. Can you believe I found "sheep" fabric and it was not made in China but Japan!! Also found a table topper pattern with sheep applique! (15 x 38). Pattern is easy and adorable. It can be found at     www.briarwoodcottage.net     #62 Calendar Pocket -  March.              

Friday, November 4, 2011

Tatted Christmas Tree and Bookmark

Tatting Times has arrived this week. Here are 2 of the patterns I tatted and very easy. The Snowflake Tree has a square trunk but  is a little wonky when the picture was taken.  Christmas Present Bookmark was tatted with variegated Lizbeth Red size 20. I like this one and works up quickly. Karey added beads to the tips however, I decided to make Josephine Knots. Karey also included a hemalyke donut for the present on the end.


Sunday, October 30, 2011

Halloween Owl

Nancy Tracy, http://www.be-stitched.com/, has a new pattern the tatted owl. Fun project and works up quickly.


Hobby Lobby has nice glass balls to decorate with. I added some paints and swirl it around. It takes time because the paint moves slowly. Then tat a crown for the top. The pattern comes from an old Handy Hands Newsletter. Works up quickly and fits very nice.


Friday, October 14, 2011

Double Wedding Ring Quilt


My niece will be getting married next year at the Round Barn in Waitsfield, VT. I am making her a Double Wedding Ring Quilt using John Flynn's strip piece method. My machine died so need to get it fix, in the mean time I am using my 1978 Bernina. It sews fine but don't want to do heavy sewing. I hope to hand quilt it if there is time and maybe she just might have to wait.

Tuesday, October 11, 2011

Tatted Earrings

Kitty, Kitty was a drop off a few months ago. We noticed her living with the chickens. Great mouser, have not seen any mice yet!! She sleeps with the chickens where it is warm at night , during the day she perches on top so she can see where the dogs are. DH has Kitty feeding out of his hands but Kitty has her limits, "please do not pick me up"!!!   Loves to be petted.

Helping Hands Newsletter, Fall 2011, has a very easy earrings to tat by Kendra Goodnow. These will make wonderful gifts for the holidays.  I added 5 beads instead of the P for the center.
 Here is an easy way to add the beads. Add the beads to a needle threader, insert the thread, pull beads off of threader on to the thread,  and wa lah...
 wind a yard on to a shuttle, do not cut the thread from the ball. (CTM)
Ready to Tat the 5 rings and chains.


Tuesday, August 23, 2011

Glass Mat and Sun Catcher

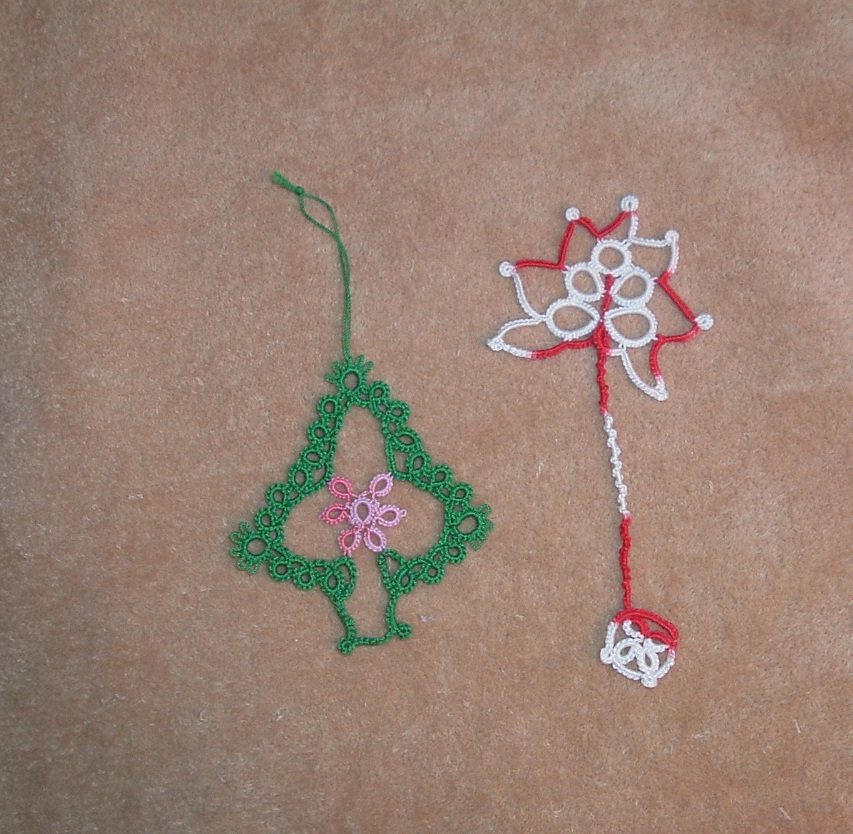
The name of this small doily is Glass Mat adapted by Kendra Goodnow from Semco Book. The pattern can be found in Helping Hands Newsletter Winter 2011. Although it is an easy pattern one must mark where you are as it can become confusing at times. It won a blue ribbon at the County Fair. I used Lizbeth 20 Juicy Watermelon (156) and Azalea Medium (620.

My dear friend Ruby mailed me some 3" brass rings. I could not find them at Hobby Lobby in TX.
Summer Daisy Tatted Sun Catcher by Nancy Tracy, http://www.be-stitched.com/, fits right into the brass rings. The blue is #30 Omega and the unframed is worked up using Tropical Punch (132) size 40.
This is an easy pattern!  Thanks Ruby (:


Saturday, July 30, 2011

Tatting Motifs


Maple Leaf pattern by Tammy Rogers. Tatted with Lizbeth 100-Falling leaves in size 20. 
 Humming bird pattern by Heather Johnson. One of them got into a fight and has a wonky beak!!
Tatted with Lizbeth 137 Berry Burst in size 20.

Snowflake 2 pattern by Roger aka Freedman. It is a very easy pattern worked up in two rounds. The outside are chains with a small ring at the tip. The tread is  Lizbeth snow white size 20. The pink heart is by Patti Duff, tatted with Lizbeth 145- Pink Parade size 40. The humming bird is a pattern by Karey Solomon worked up in a SCMR. It is one of my favorite bird pattern to tat up along with the Lizbeth 20 - 156 Watermelon. Jon's dragonfly also works up very quickly and nice to add in lots of projects.

These are for gifts and exchanges.

Wednesday, July 20, 2011

Sun Catcher

Here is a sun catcher tatted up with Lizbeth 156 Watermelon. The pattern is by Nancy Tracy and very easy to work up. I added a few glass beads in the center but did not read the pattern and there is an odd number of picots. So the last two picots have no beads and decided to put them at the top to balance it out. A designer touch!  Nancy used a 3 inch ring and I used a 4 inch ring. In order for the tatting to be attached I tatted another row of chains with about 8 picots per chain section and that worked out. The tatting was attached with invisible thread and a bell at the bottom. It is very pretty in a window.

Tuesday, July 19, 2011

Tatting Exchange

Rose Anne Burdeny from Winnipeg, Canada tatted the bell and Christmas wreath. Rose Anne was my tatting exchange person in the Needles and Shuttles Yahoo Tatting Group.  The bell is the perfect size as I like small motifs and the wreath is just stunning with all the beads.  Very nice tatting and THANK YOU Rose Anne!!!!!


Here is the card Rose Anne sent along with the tatting.  When I opened the envelope I said ...WOW!!!  The Crazy Quilting group has a new round robin and it is all about sewing... Just think of the possibilities one could do with this card!!!

Friday, July 15, 2011

Rattle Snake

 I let the dogs out and we all walked right pass this small diamond back. He must have just eaten because he did not rattle or coil.  Our place is all fenced with metal and he must have squeezed in. One can see to the upper left where I opened the gate and stood on the cement to open it.   It has been so hot (24 days over 100) and DRY this summer. This is the first rattler we have seen but we do have 5 ft red racer and a bull snake roaming around. They eat mice and suppose to keep the diamond backs out.


Hubby shot the head off and he coiled. 

Monday, July 11, 2011

Christmas in July Tatting Exchange


Needles and Shuttle Yahoo Tatting Group has a Christmas in July Tatting Exchange this month. Here is what I mailed to my dear lady in Canada.

Christmas Bell tatted with Lizbeth Snow White #20. The pattern is from Pam Palmer. I altered the pattern to work it in one continuous item by using a split ring. Also added beads on the bottom and one Iridescent for the clapper.


Sewed up a lacy tatting bag. The ribbon can also hang from the wrist while tatting.


Ten yards of Lizbeth Red Burst size 20, small wood shuttle with a little Lizbeth thread, some is tatted up using Hens and Chickens and a Magnet card using the Red Burst and pattern Hens and Chicken. Made a nice little hat for the dogie.

Friday, July 8, 2011

Crinoline Ladies

Twelve Crinoline Ladies ready for a new home to be embroidered.
The pattern is from Pam Palmer, "Tatting Treats Two".


The ladies have been washed with Purex and Lavender, blocked and sprayed with Mary Ellen's Best Press Lavender spray starch.


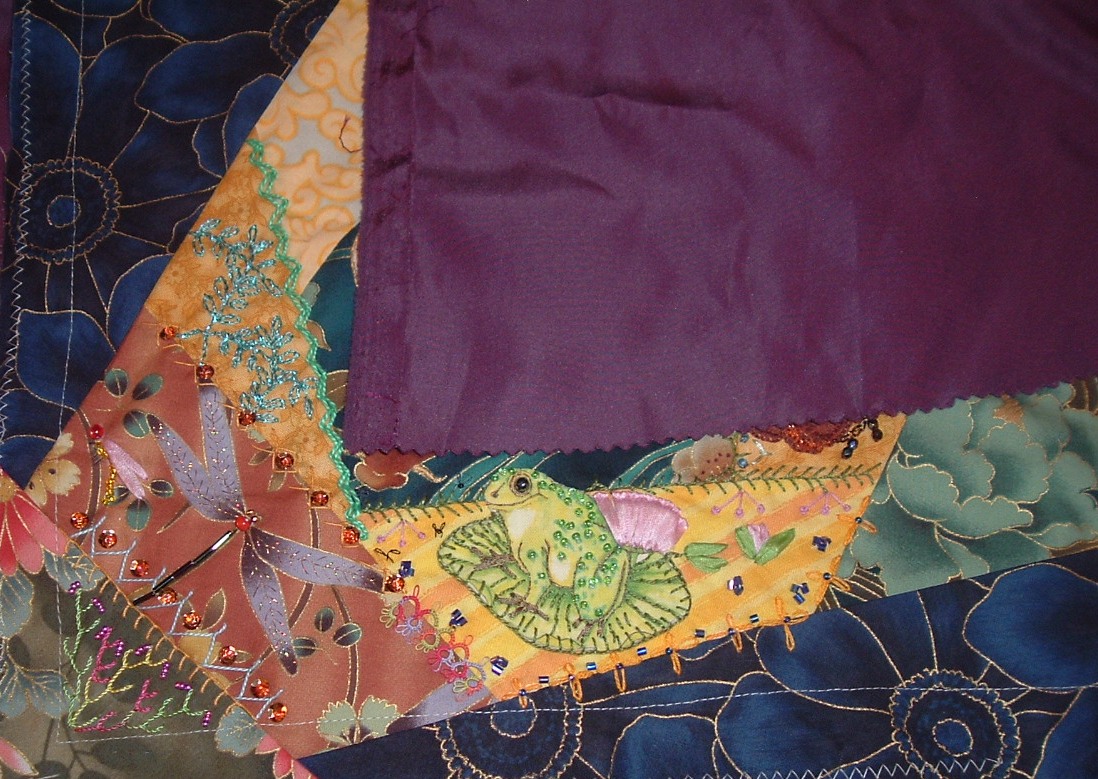
This Tatted embroidered lady I added to a round robin block for Ruby.


Sunday, July 3, 2011

Happy
Fourth of
July


Friday, July 1, 2011

Post Card

CQ and Tatted Post Card

Monday, June 27, 2011

Fish Block

Here is the last of the CQ Round Robin block and it is Pam's Fish Block.

What is a fish block without a frog. Mr Frog was printed on Kona Cotton and sewed to fusible interfacing. Turned right side out and appliqued down with  button hole stitch and outline stitch. Beads were added and a silk ribbon Lily on the pad. Another silk ribbon Lily pad was added to the side. The seam treatments include a piece of tatting, lazy daisy stitch with beads and a fancy button hole stitch by the frog's head.
 The Dragon Fly is fly stitch using Sulky Metallic Threads and beads for the body. To the left is a small dragon fly made with beads and silk ribbon. Beads were added to the seams and Feather Stitch with beads in the corner.
                                                Here is a picture of the block I stitched on.

The whole block. Katy was the first to stitch and she beaded the entire back of the fish, added leaves and the three beautiful flowers with beads. Stunning...
When completed the block is returned to Pam in WA. Pam's first block with two people had their stitching on it was lost in the mail. How sad to lose a beautiful piece of work.. Katy and I make sure the envelope is fully taped with large address labels.
I loved working with this block, it was fun and easy to do.

Tuesday, June 21, 2011

New Mexico Landscape


Thistle flowers in the Desert of Tucumcari, NM


The only plant  that will grow without RAIN!


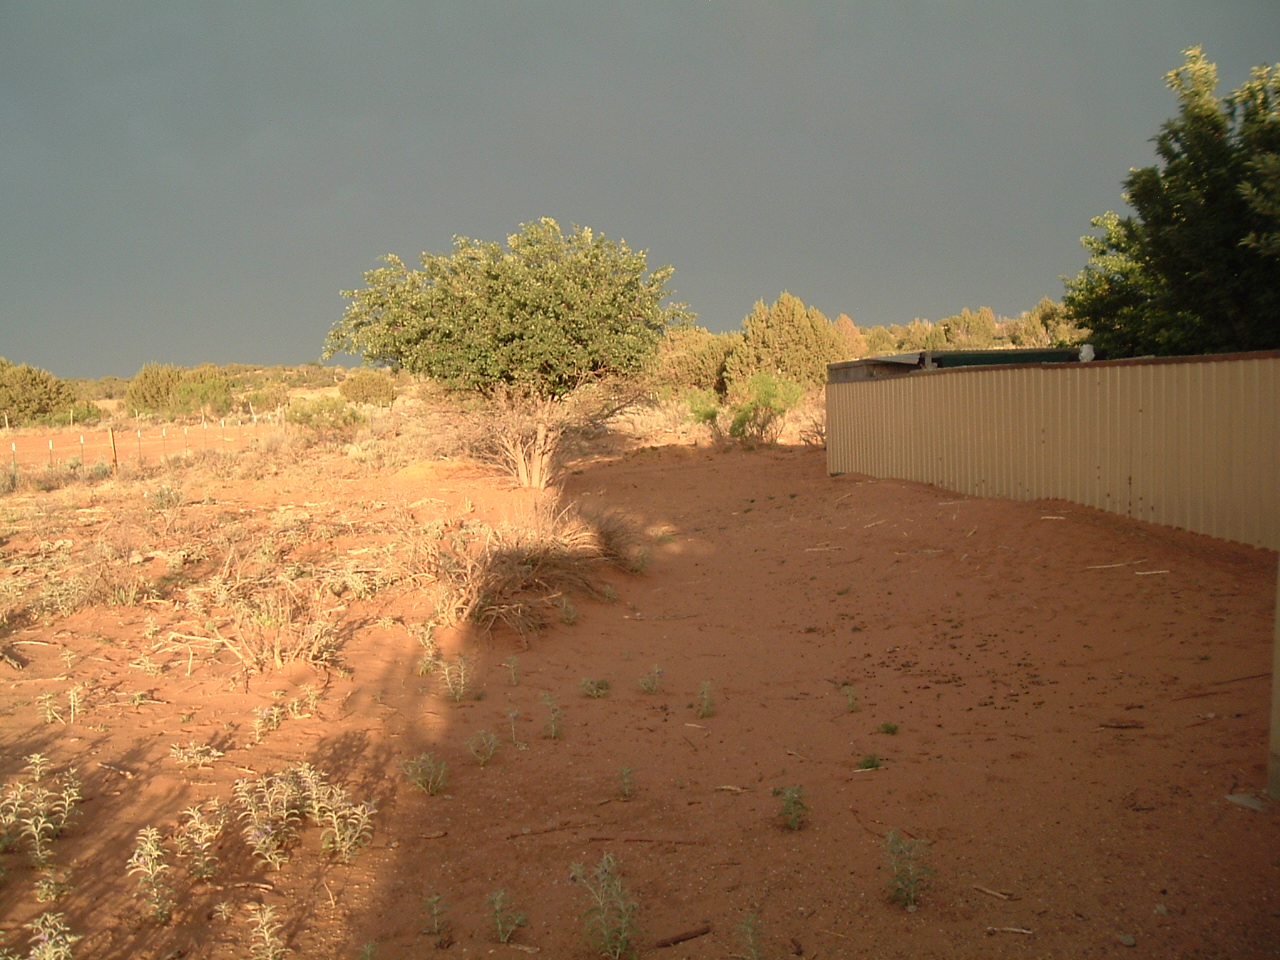
We have 2 1/2 acres and it is always green with grasses and weeds.
This year we have seen NO RAIN since Jan and temps in the 100's for more
than 14 Days. We are in a  drought and fires all around.


Hi, my name in Dilly and my job is to eat weeds.  What weeds!!


Tuesday, June 7, 2011

Cell Phone pocket


A quick and easy cell phone pocket for my sister' Birthday. My sister and hubby visited us a few weeks ago from Cape Cod. She mentioned that most of her slacks did not have pockets and was looking for something to put her phone in.  A little tatting, a few CQ stitches, sew another fabric on top and tuck it inside for a lining. Take some necklace  string and braid it for the length, sew to side of pocket. I need to make one for myself now....

Sunday, May 29, 2011

Memorial Day


Freedom's Colors
©2002 Roger W Hancock 
Red is for Bravery;
blood shed in sacrifice.
Freedom came with lives the price.

White is for Liberty;
freedom's purity.
Life be free from God's decree.

Blue is for Justice;
as vast as the sky.
Over freedom's land to occupy.


Flag Book Mark I designed with rings and chains.

Thursday, May 26, 2011

Ruby's CQ Block

Ruby's CQ block is all about Victorian. I tatted a Crinoline Lady from Pam Palmer's book, "Tatting Treats Two", using  size 80,  Lizbeth 615, Yellow LT thread. It was tacked down, sequence added and  silk ribbon roses made with french knot and stem stitched. Also added was a silk ribbon for her hat. A spray of stem stitched roses fills out the area. To the right is Herringbone filled with more silk ribbon roses. To the left is Feather stitch with beads and the bottom are Lazy Daisy butterflies and Chain stitch. 
The black berries and Cretan stitch in upper left corner were stitched by Katy
 Ruby's left side corner block, I made a Victorian Shoe using the Buttonhole stitch to sew it down and filled with Lazy Daisy flowers.
The pattern came from the Carr Crazy Quilt, 1888.
The tatting pattern  is  Mary Konior's  Leaf Braid to cover the curved seam. The thread I used was Lizbeth 40, 124 Spring Garden. Four tiny beads were added to the top of the tatting.
This is the completed block so far. Pam is the last person to work on this block and can't wait to see the finished piece. Will post a picture when it is completed. Nice work by all of us!!!

Friday, May 20, 2011

Portugal and Maria's Tatting

Look what my Tatting Angel from Portugal sent. Thank you very much!!! I am always interested in seeing the rest of the world even if it is from pictures.


Legend of the Barcelos Cockerel

According to legend, a pilgrim on his way to Santiago de Compostela was condemned to death by hanging at his pass through Barcelos, having been unjustly accused of stealing some object of value. Shortly before the sentence was carried out, the condemned man commended his soul to Saint James. In answer to his prayers, the roast cockerel the judge in charge of the case was about to eat stood up and started to sing. This is the origin of the famed Barceló’s cockerel, universal symbol of Portugal.
Very Interesting….
Maria lives outside of Cascais.


The best of all is Maria’s tatting!! Isn’t it beautiful…Many Thanks

Thursday, May 5, 2011

The Heavenly Orb


The Crazy Quilt International Group has a challenge for the Sun and Moon. I decided to enter the challenge right after Jane Eborall's Tat it and see that turned out to be an airplane. 

 Here is the center of the wall hanging. I had "sun and moon" material so I embellished it  with silk ribbon and beads. On the left is a red moon and beads from Guamilito Handcraft Market, Puerto Cortes, Honduras.  My girlfriend travels and this was a gift from her. The Owl and the Moon is a red work from an 1800's quilt.  It is hard to see but on the right of the moon is butterfly material heavily embroidered in gold threads. To balance the butterfly, I cut one from the material and appliqued it on to the left of the moon, also embroidered in gold thread. You will find bits of tatting and buttons surrounding the moon.
 The top right is a red work "Sun and Moon" kissing. You will find the pattern in Patricia Cummings E-book "Redwork Renaissance Revisited". At first it did not show up so I painted it with ink paints and happy with the results. Adding the outline stars, sequins and crystals it makes it stand out. At the top is an outline of the big dipper and  a handcrafted butterfly from Burano, Italy. It is an island off the coast from Venice. Another gift from my friend Jessie. Thanks Jessie, love all those little gifties and finally found a home for them!!!
 On the bottom left is a blue work "Crescent Moon Goddess" from a nineteenth century design. It is in Patricia Cummings book, "Redwork Renaissance". My first Crescent Moon Goddess is on my very first crazy quilt. I am so pleased that Patricia did a write up with a picture of my work for her e-book, "Redwork Renaissance Revisited". Please visit Patricia  at  http://www.quiltersmuse.com/ 

 The center at the bottom are my UFOs... The center one is made with felt and embellished with beads. The bottom UFO is a button that looks like a hat and streamers added. Saturn is made with the long and short stitch and a gold trim for the ring. The little dots are small squares and stars  all hand stitched with Kreinik Metallics.
On the right corner is the tatted airplane from Jane Eborall's TIAS. Thanks Jane for the fun adventure during the dreary month of January!! It is hard to see but above the first wing it is back stitched and reads, "Fly Me To The Moon"!!!! Of course there has to be a jet trail worked in silk ribbon fly stitch.
 On the top left side are two more moon goddess embellished with silk ribbon and beads.  The big butterfly charm was painted with blue ink and dusted with Fairy Dust!
The finished wall hanging with the label. I added a thin batting and hand tied through out the wall hanging. All threads were knoted and sewen back into the quilt so no threads show just a dot where the fabrics were connected.
It was a lot of work but challenging and fun!!